
Give your broken plates and bowls a second life, with tree sap
The 400-year-old art of kintsugi will have you knocking over your cups, on purpose
The next time a paw, handbag or butter fingers send a ceramic plate crashing – do not hunch over and sigh. Gather the broken pieces with a brush, away from the bin. A new life awaits your shattered china.
And by the time you’re done mending it, dusting gold along the fault lines, you might eye the rest of your cabinet with a scheming glint. Ooh, the possibilities.
But wait, a few things to consider. Restoring a dish this way can take more than three months – that’s how long Japanese artisans wait before broken pottery is given a facelift. That’s how long Ayako Ogawa, a 32-year-old ceramist born and raised in Kyoto, Japan, waits before seeing her ‘kintsugi’ jewellery come to life.
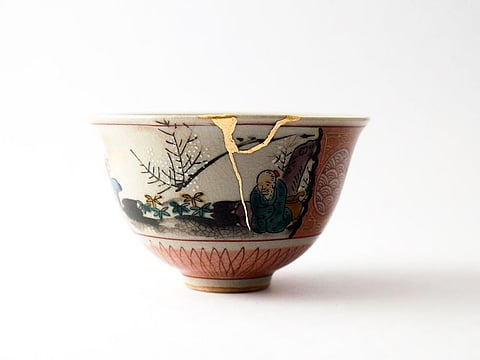
We’re talking about the 400-year-old Japanese technique of ‘gold patching’ broken ceramics – from tea cups to vases. Though the kin in kintsugi stands for gold (and tsugi for patching), it’s actually a humble tree sap that does the sticking. The luxurious gold we see is sprinkled during the very last step.
A jeweller to kintsugi enthusiast
“The tradition had been passed down quietly, but only a few people in Japan knew about it. With the recent trend toward sustainability, this is attracting renewed attention here,” Ogawa tells Gulf News, all the way from the cultural heart of Japan – Kyoto.
She does not call herself a kintsugi master, though clay could melt in her hands. Much like you and I, Ogawa had heard of the craft but never fully grasped its significance, history, method. This was until she fired a kintsugi ring in 2017.
Customers instantly loved the new design. It was different, it was traditional. On its head sat a large ceramic stone, broken apart and put together using a familiar strip of gold.
But to Ogawa, none of the compliments felt right. All she did was pick up a quick repair kit! There was nothing authentic about her design nor could she explain the artistic process if anyone asked. The ceramist rolled up her sleeves and got to learning, from books, from active artisans in her community, from trial and error.
What is kintsugi?
It all boils down to three steps. Gluing, filling and drying.
The patching process is patiently repeated using the sticky brown sap of the varnish tree – urushi or lacquer it’s called, Nature’s glue and paint since ancient times. The repaired object is then tucked away into a dark and damp cabinet to air dry for weeks till the paste hardens, holding the shards together. Only after the final wet coat of lacquer is applied are the cracks brushed with gold, silver or platinum powder. Jajan! Your kintsugi plate, cup or bowl is ready for use.
Everything is done with Nature in mind. A strict zero-waste policy.
In 2015, Google saw a sudden worldwide interest in the way of kintsugi. From the BBC to The Irish Times, kintsugi dominated headlines, egging DIYers to add repair kits to their shopping carts. But when easy modern means of fixing dishes exist, (re: our trusty tube of super glue), why are we still looking to kintsugi?
Repairing pottery, repairing souls
The concept does more than repair – it changes the way you look at loss. Ogawa says it’s okay if an object breaks:
“Breaking is an opportunity to transform things into your unique landscape,” she added. And nothing is lost in translation.
People have been applying the repair method to heal themselves. Seeing how kintsugi celebrates flaws in pottery – “Kintsugi does not make the [cracks] disappear, but instead adds decoration to make them stand out,” Ogawa pointed out – we’re encouraged to accept our own. And for the times when we do crumble and break, there is good chance we’ll emerge stronger for it.
But it also teaches us to value the cups and plates we put to use every day. When Ogawa started out seven years ago, she only had books to guide her and the occasional help from lacquerware artists. As practice she went around fixing whatever she accidentally broke at home.
“I felt an indescribable attachment to these vessels that had come to life in my hands,” she wrote in her blog entry on kintsugi in 2020. To us, she said: “I hope the world will become a place where it is natural to fix and use broken things.”
Why you need to drink out of broken cups
Such a world did exist in fifteenth century Japan and onwards. If you’ve heard of wabi-sabi, you will also know that it dominates the Japanese way of life, from uneven architecture to taking your tea in lopsided bowls. The gist is that there is beauty in things that wear with time, in things that are flawed.
“Kintsugi techniques as we know them today were born over 400 years ago, from the Azuchi-Momoyama period to the Edo period,” Ogawa said.
By the time tea ceremony or chanoyu picked up heat, legendary tea master Sen no Rikyu applied wabi-sabi to simplify the ritual, adds Ogawa. It featured irregular clay tea bowls, a small room with mats and stepping stones in the garden that were never arranged in a straight line. So naturally when cups shattered, Rikyu was the happiest for it.
In a collection of essays published by the Herbert F. Johnson Museum of Art in 2008, a San Francisco-based tea ceremony master Christy Bartlett quotes Rikyu: “[Tea] jars that have been repaired with lacquer become all the more fit for use.”
Ogawa says this was the wabi-cha (wabi-tea) style of ceremony, “in which waste is reduced to the absolute minimum”. Then, in the face of all the simplicity, you’re probably wondering: Why gold?
Luxurious powders were a way of saying: ‘This repaired tea cup is all the more precious for breaking.’ Gold is a mark of respect shown to the imperfect ware.
Try out this therapeutic fix
Are you tempted? The Japanese have always upcycled their broken and chipped dishes, which makes us wonder why we are so quick to trash ours. So we did the homework for you and asked Ogawa to share the kintsugi process she follows, whether be it to design her jewellery or repair her kitchenware.
Step 1: Apply lacquer glue to the cracks
You could carry this out with a readily available kintsugi repair kit, with all the ingredients.
But raw Japanese lacquer can be bought online as well. To make it sticky and glue-like, you will need to mix it with flour and water till it reaches a paste-like consistency.
Most people react to raw lacquer before it hardens, in which case opt for synthetic glue.
Step 2: Glue the pieces together
Use a spatula to smooth the paste on the edges of the shards. This is where it gets exciting because it’s a lot like solving a puzzle. Recreate the object using the dark brown paste and fix the pieces together.
Now let it sit inside a box or a shut cupboard with a glass of water (or regularly spray with a spritzer). Lacquer needs a bit of humidity to harden.
Check back in after two weeks. (If you’re using synthetic lacquer, this step might just take less than a day.)
Step 3: Fill in the gaps and bumps
Once dry, take the object out and check for any gaps or bumps that need filling. What do you fill these with? The lacquer paste, of course!
And in it goes inside the box for two weeks again.
Tip: According to Ogawa, smaller shards take the longest to dry and harden – so be patient if the lacquer is still wet, let it sit.
Step 4: Repeat Step 3 till firm
You have to make sure there’s no leakage when you’re using the restored dish. Lacquer shrinks when it dries, so you will see some gaps after step 3. Repeat the fillings followed by a two-week drying period till the shards feel firm.
Step 5: Decorate with gold powder
When there are no gaps left between the cracks, you can finally decorate with a metallic powder of your choice. Gold leaf is another alternative to the more expensive gold powder.
“Gold is used for the first time in the final stage of decoration, just before the top coat of lacquer dries,” said Ogawa.
But before you pick up your brush, get a sandpaper to smooth out the dried lacquer. Then apply your final lacquer coating with a brush, followed by the metallic powder while still wet. Wash your dish after the decorative powder dries.
Yes, kintsugi-repaired dishes are all safe to eat in, if you’ve used natural lacquer and pure gold powder.
(First published on July 4, 2022)


